How to store and access data from a Strapi plugin
Plugins in Strapi help you add additional features to the existing core set of built-in features. They can be used to extend the API, customize the admin panel, and more. In many cases, you would like your plugin to store data for later retrieval, and to access this data.
To store data with a Strapi plugin, use a plugin content-type. Plugin content-types work exactly like other content-types. Once the content-type is created, you can start interacting with the data.
Create a content-type for your plugin
To create a content-type with the CLI generator, run the following command in a terminal:
- Yarn
- NPM
yarn strapi generate content-type
npm run strapi generate content-type
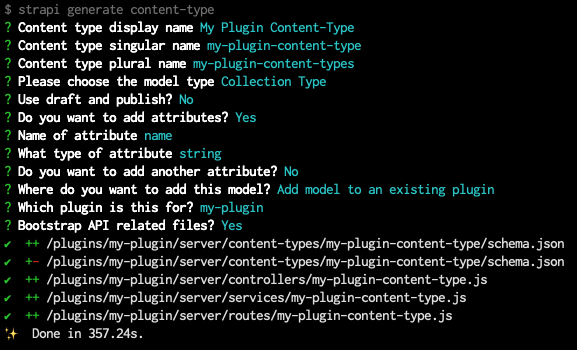
The generator CLI is interactive and asks a few questions about the content-type and the attributes it will contain. Answer the first questions, then for the Where do you want to add this model? question, choose the Add model to existing plugin option and type the name of the related plugin when asked.

strapi generate content-type CLI generator is used to create a basic content-type for a plugin.The CLI will generate some code required to use your plugin, which includes the following:
- the content-type schema
- and a basic controller, service, and route for the content-type
You may want to create the whole structure of your content-types either entirely with the CLI generator or by directly creating and editing schema.json files. We recommend you first create a simple content-type with the CLI generator and then leverage the Content-Type Builder in the admin panel to edit your content-type.
If your content-type is not visible in the admin panel, you might need to set the content-manager.visible and content-type-builder.visible parameters to true in the pluginOptions object of the content-type schema:
Making a plugin content-type visible in the admin panel:
The following highlighted lines in an example schema.json file show how to make a plugin content-type visible to the Content-Type Builder and Content-Manager:
{
  "kind": "collectionType",
  "collectionName": "my_plugin_content_types",
  "info": {
    "singularName": "my-plugin-content-type",
    "pluralName": "my-plugin-content-types",
    "displayName": "My Plugin Content-Type"
  },
  "options": {
    "draftAndPublish": false,
    "comment": ""
  },
  "pluginOptions": {
    "content-manager": {
      "visible": true
    },
    "content-type-builder": {
      "visible": true
    }
  },
  "attributes": {
    "name": {
      "type": "string"
    }
  }
}
Ensure plugin content-types are imported
The CLI generator might not have imported all the related content-type files for your plugin, so you might have to make the following adjustments after the strapi generate content-type CLI command has finished running:
In the
/server/index.jsfile, import the content-types:/server/index.js'use strict';
const register = require('./register');
const bootstrap = require('./bootstrap');
const destroy = require('./destroy');
const config = require('./config');
const contentTypes = require('./content-types');
const controllers = require('./controllers');
const routes = require('./routes');
const middlewares = require('./middlewares');
const policies = require('./policies');
const services = require('./services');
module.exports = {
register,
bootstrap,
destroy,
config,
controllers,
routes,
services,
contentTypes,
policies,
middlewares,
};In the
/server/content-types/index.jsfile, import the content-type folder:/server/content-types/index.js'use strict';
module.exports = {
// In the line below, replace my-plugin-content-type
// with the actual name and folder path of your content type
"my-plugin-content-type": require('./my-plugin-content-type'),
};Ensure that the
/server/content-types/[your-content-type-name]folder contains not only theschema.jsonfile generated by the CLI, but also anindex.jsfile that exports the content-type with the following code:"/server/content-types/my-plugin-content-type/index.js'use strict';
const schema = require('./schema');
module.exports = {
schema,
};
Interact with data from the plugin
Once you have created a content-type for your plugin, you can create, read, update, and delete data.
A plugin can only interact with data from the /server folder. If you need to update data from the admin panel, please refer to the passing data guide.
To create, read, update, and delete data, you can use either the Entity Service API or the Query Engine API. While it's recommended to use the Entity Service API, especially if you need access to components or dynamic zones, the Query Engine API is useful if you need unrestricted access to the underlying database.
Use the plugin::your-plugin-slug.the-plugin-content-type-name syntax for content-type identifiers in Entity Service and Query Engine API queries.
Example:
Here is how to find all the entries for the my-plugin-content-type collection type created for a plugin called my-plugin:
// Using the Entity Service API
let data = await strapi.entityService.findMany('plugin::my-plugin.my-plugin-content-type');

// Using the Query Engine API
let data = await strapi.db.query('plugin::my-plugin.my-plugin-content-type').findMany();
You can access the database via the strapi object which can be found in middlewares, policies, controllers, services, as well as from the register, boostrap, destroy lifecycle functions.